Tuesday, 29 December 2009

studio photography sam

Trying out different lighting on a subjects face. what angles of light to use and what shadows are cast. learning outcomes, what type of light gives sertain effects depending on your style of photograph and what light is complementing.


here is the result of 45 45 degree lighting with two soft boxes
in result the effect highlights one side of the subjects face and the soft box on the left hand side softens the shadow on the left hand side.

set up of the soft box lighting.


a more filled frame of the first photograph. you can see in detail what places the shadow is hitting and what places the light is illuminating.


here is a set up using the white reflector board to the left and one soft box to the right.

in result the shadow is not as harsh on the left hand side and gives an over all softer effect on the face. there is still a faint shadow visable, but no were near as harsh.


here there is  a set up that involves having on soft box lit up and placed behind the subject. the subject is obviously way to dark and not alot of detail is visable. this type of lighting isn't very complementing. but could be used for artistic photography. a little like Caravaggios's lighting in his paintings.

(above) an example of the lighting set up. two soft boxes both with light defusers one swiched of to the front right of the subject and one lit up at the back left of the subject. and a white board reflector to the left of the subject dead on her side.

Here is the lighting set up for the image below there are two soft box lights both with light defusers both switched on with a white board reflector to the side of the subject.

in result the image has allot more illumination in places it didn't have before. The shadow is also slightly more faint and the hair is alot brighter in this potrait photograph than the second potrait photograph up from this one.

the lighting set up above: two softbox lights with diffusers. one to the left of the subject switched on and one infront of the subject but raised facing the subject.

the same lighting set up above but with the soft box the the left of the subject switched of.

as you can see the face of the subject is lit up quite well, but the hair is slightly too dark under the chin area and neck area have to much shadow aswell. with the soft box  being above the head and the subject looking up directly at it, there are less places for the shadows to hide.

Above a set up that includes two soft boxes each with a diffuser this time a white reflector board that is being placed on the sujects lap. the top light box is switched on facing the subject. while at this stage the soft box to the left of the subject remains switched of .
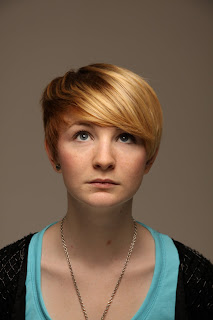
here you can see that the subjects face is still illuminated quite well. The white reflector board has improved the shadow unernieth the chin and neck area by making the shadow less harsh. The hair is still slightly too dark in areas.

The lighting set up is being changed the top softbox above the subject still remains in place as dose the white reflector board. the soft box to the left of the subject has been removed and being placed behind instead and is switched on.

The result is that the subjects profile photograph is allot brighter all around a very faint shadow still cast around the neck and face area alot less visable from all the previous images. The hair is also iluminated alot more.


 here an image where the shadow is slightly more faint than the above over all these two photograps and the lighting set up that goes with them works in favour to make the subjects features alot more softer. In conclusion the more light used in an area the less likely it is for shadows to hide, there for any sharp lines  are softened.

objects1 EXAMPLES OF MY MACRO


these two images (below and above) are of tiny little berries covered in little plastic balls about 1cm in diamiter. i love the effect these macro shots give the berries, the clear plastic looks like water droplets were in focus. The photograph below i have changed the amount in vignettes. This i think has benifited the photograph and given it a sertain atmosphere, quite a cold, icy and wintery look. Which in my opinion works well with the warm red and the droplets which could be frozen.


(Below) a range of crystal and glasses i have experimented with macro shooting with an open flame candlelight.

(Above) some amathist/rose quarts crystal. The deatail in the crystal is what i love about it. the layers and lines are in focus in the crystal and different purple and pink tones that are reflecting.

(Above) a red glass candle holder. I have discovered the different effects with a candle light being penatrated thru different glass and crystal and love how the candle light with this glass is highlighting sertain parts of the glass. what i like about this shot is how the focus point has caught the detail of the light on the sharp edges of the peices of glass and the fore ground ( front of the candle holder) is out of focus. the background copletely blacked out drawing the eye even more so to the focal point.

(Above) The main element of this photograph what i like is the differnt textures visable when shot with a macro lense. There is gritty, matt and shiny reflective surfaces with this crystal. this macro shot bring all those aspects out.

(Above) another shot of the candle holder from a different angle. this time there is slightly more in focus and its more apparent that there is light being shone through. Again the detail and colour in this photograph i like. Especially how each individual peice of glass has been illuminated and become more transparent.

(Above) Probably my favourite macro shot from the selection. The depth of feild and focal point is in my opinion just right. an interesting flower upon a bouquet i never noticed in my house before. excellent opertunity. the more i look upon this macro shot the more detail i see in this flower. The different textures   work really well together in such detail all the tiny hairs visable and the uniquie ins and outs of the stigma.

Here there are six macro shots i have taken of a little cherub ornament. I love these photographs as a series and on their own idividualy. Each one has its own atmosphere.


With this series of photographs i love the tone and colour, the white balance which  i have used has created the right effect i wanted, which is a cool dreamy effect. the feathering done by the macro lense adds to this effect.


There are another series of macro photographs i have taken which you will find in my course folder. i have decided to but them in a hand made scetch book. i have chosen to do this to create a background that matches the particular theme of the shots.


Monday, 30 November 2009

Location photography - 1 different lighing at night


There are two different lighting effect here. firstly the the streetlight which falls onto a section of the tree and its leaves highlighting the selected area that sticks out, leaving the rest of the trees detail in darkness, i quite like this lighting effect on the tree, due to the contrast and the illusion that there is no tree trunk, somewhat  like a cloud of leaves.
second type of lighting was by chance a car approaching. The headlights reflecting of the metal bus stop. anything that would need to be highlighted underneath the tree would need a light source from this angle or the opposite angle to be seen well enough.


The lighting here on a 'black path' on the way to my house, you can see why it is called the black path. There isn't much highlight in this photograph apart from the the water reflection on the tarmac. Due to the surface texture and reflection there has been quite a lot of contrast and detail picked up on the path. There has been loss of detail everywhere else on this image. looking back, to achive a little more detail of the surroundings i should have tried to either decreace shutter speed or aperture.

Further down from the previous image i took this photograph there is much more lighting here and i just managed to catch a subject underneath it. this lighting from above is highlighting


A little further down from the previous photograph i took this one. I saw how this street lamp caught the stone wall, the metal post and the grass surrounding it, as you can see the white street lamp is illuminating the area well even picking up all the colours in the grass, leaves and brick wall.

Again another image similar to the above, i took note of this lighting a week or so before i took this picture because as soon as i saw it i thought of the photographer Gregory Crewdson as he is a photographer which is known to use artificial lighting with natural light. This image perticularly reminded me of a specific photograph of Gregory Crewdson.
untitled (pregnant woman/pool), Gregory Crewdson

I have really grown to like Gregory Crewsons photoraphy,  his work has a unique style, each photograph seems like a scene from a film, not from behind the television sceen or cinima but like a photograph from the film set with an element of a dreamy feel and also a fairy tale
 feel beutiful bold colours nomatter how plesant or unpleasent the image. Ther is also an element of surreal and querky scenes that seem unlikely in real life. looking at some of his work remind me of a the film a midsummer nights dream originaly a play written by shakespere but reinvented into a film by the director Michael Hoffman.


Here there is a car bonnet and a fragment of he trees leaves, that has been lit up from the orange street lamp above, this lighting effect is more defined when there are no surrounding lights to disturb it. So there for a more succluded area at night with this light at night or not long after twilight in summer would work best, rather than on a moterway or street were there are car lights, house and building lights  intruding.

This flouresent lighting from above was on the bus, as you can see the lights are revealing alot of contrast on the bus. There for wouldn't be very complementing for a subject but maybe for the definition of an object. A reflector could also be used on a subject to illuminate them and make them stand out in this lighting.

Another type of flouresent lighting from above, taken out of the bus window. I think to bring the eye into a dark photograph such as the background on this one this type of lighting is very useful. Again quite a similar aspect to the street light.

A photographic example of the flouresent lighting from above lighting a subject underneath. Reflecting the light from underneath the subject would counteract any shadows being cast.

Lighting under the train station. this lighting is fairly bright so would be good for a less contrasty photograph. Being close to this light would be quite usefull for the facial features as there would be limited places for shadows to hide. in a way this light would act as a spot light

This is the first picture i had taken to start my recording of different light sources. It stood out to me first because of how the building was set in a dark cornet and the street lamp is quite close to one side of the building illuminating one side and there for giving it its shape. The conclusion i came to with this photograph is that to achive more definition on a subject or object from a street light the light has to be fairly close. If i were to take a picture of a subject underneath this light and was trying to keep their facial features hidden with the shadow from the hair, forehead or hood to obstruct the light this would not be succesful with the light source so far away from the subject.


Digital darkroom - 1


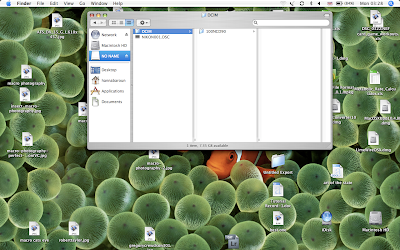
Firstly click on the USB logo on your desktop or in your hard drive. I prefer to select the collum view as its easier to see were everything is. Then select your camera/model.
 

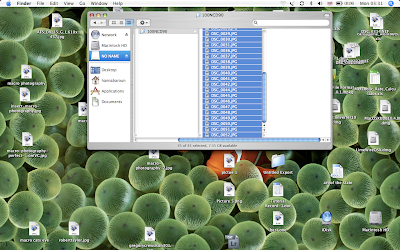
Click the first image in your file press and hold the shift key and then click the last image in your file. all of the images will be selected, then click the selectiion and drag into the Adobe Lightroom logo in your program bar at the bottom of your srceen.


Before lightroom is opened a window will appear to import photos. With the top selection choose photoshop this will back your photos up there. Then click import at the bottom right corner.

Lightroom will then open with your photos on view what you have just imported. If you look to the bottom left of each photo you will see stars, this is to rate your photographs as 3 star, 4 star etc on what selection of photographs are better than others.

Then to find your rated photographs go to the bottom right of your window where it will say filters, if you click the arrow and select rated it will let you select all your rated photographs (the ones you have rated with stars).

if you select the stars that are next to where it says filters again in the bottom right of your window, you can select specific star rating of your photographs. Here i have selected 4 star and it has brought forward all my 4 star rated photographs.

Again in the same style, there is one flag at the top right of each one of your photographs. So if you had to mark a specific style of photograph for any reason, lets say out of all the photos you had 1, 2, 3 ,4 and 5 star rated there were a few from the whole collection that had a specific element/ detail/ angle etc.

Above you would click on the flags to select those few out of the whole selection. If ever you needed to find those select few that had that certain element/detail/ angle etc, just go to the filters and select flagged. doing that will bring forward the photographs you have selected with a flag.